In the past 2 years, we automated a huge amount of processes in our company using Integromat and Zapier. We even experimented with running a whole department in our company (Phone service dept) entirely on no-code for customer CRM (Trello), notifications (Integromat), and - even PDF design (Webflow + Zapier).
Looking back, we feel it’s doing its job tremendously well, and we don’t want to change it. We expected to only use the solution temporarily for prototyping, but it seems we are going to stick with it.
When I started using Webflow, I always thought that I want to see a tool very similar to that but optimized to help to generate dynamic/personalized print files in PDF format.
I will not go into depth too much but will happily discuss any part in the thread if anybody is interested. The structure/logic is quite simple:
-
Make a new CMS collection in Webflow with all the fields you want to include in your dynamic PDF.
-
In an automation tool of your choice (Zapier in this case), use the action “Create a live item in Webflow” to create a CMS entry with any data you want from the previous steps in your Zapier scenario.
The data can include anything - in our case, we want to print a “Service appointment confirmation” PDF, so we’ll pass all the data we need from our reservation form (Typeform) via Zapier to Webflow (Reservation ID, customer name and contacts, service and price, notes, etc).
- Now that we have created an actual test live item in webflow, this allows us to design our PDF template. Just open the violet collection page and design the document like you would design any website in webflow
 hint: use relative widths and some custom css for print (pagebreaks,…).
Our collection page for Service appointment confirmation looks something like this (sorry for Slovenian):
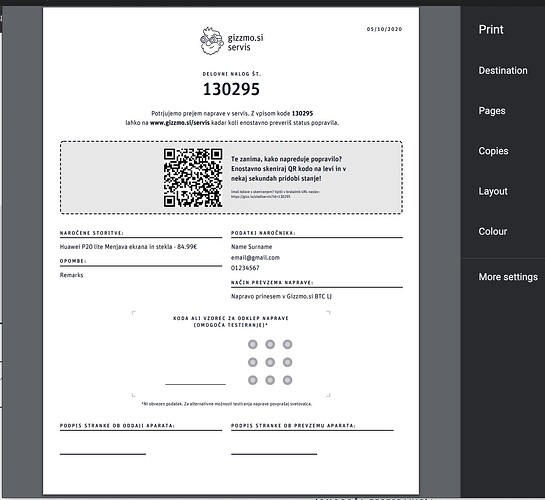
Some text fields are pulled and populated with dynamic data from CMS, the same can be done for images, and we even render a QR code that includes the reservation ID from CMS for easy status tracking (using qrcode.js).
- Back to the Zapier scenario, add a next step now - We use a “Capture a website” action from CloudConvert.
CloudConvert is a great service/api (even the free plan covers simple low volume jobs like this one) that helps you convert stuff. In this case, it simply pulls in the URL of the webflow live item we created in the previous step and converts the HTML from the page to PDF (the step config includes all the settings you want to set like document margins, size, etc). It returns a PDF file that looks something like this when printed:
And that’s it! We can then proceed with the next steps in Zapier to do anything we like with this file - store it in Dropbox/Trello/Drive, email it, even print it automatically using Cloud print etc.
What’s great about this system is that it’s amazingly convenient to maintain/change for a web designer. Anytime I want a change in the PDF I simply edit the collection page, publish the project and the change is instant. It’s super easy to get any custom fonts you like to PDF using webfonts, render a QR code like in this case with custom embed etc.
Hope it helps someone ![]()
Important tip: if the data on your PDF includes some personal information like in our case, be sure to add a step that archives or deletes a live item right after your Cloudconvert step:
This way you make sure that the data would only be published for a couple of seconds to allow Cloudconvert snapshot before it’s removed. Of course, you should also make sure your collection URL is not linked/published anywhere on the internet, obfuscate your slugs that are generated and also add meta no-index to make sure it would not get indexed at any point. I am looking for ways to solve this part in a more elegant and secure way - open for suggestions!


